| 前のトピックへ :: 次のトピックへ |
| 作成者 |
メッセージ |
480sparky 


登録日: 2013年4月16日
投稿: 355
所在地: Iowa
|
 投稿日時: 火 1月 28, 2014 9:03 pm 件名: Fresh, new look for my B&W vision |
|
投稿日時: 火 1月 28, 2014 9:03 pm 件名: Fresh, new look for my B&W vision |
|
|
480sparky wrote:
For a long time, I've been searching for that 'perfect' B&W conversion for my images. I have always wanted a process that had contrast, fine detail,….. yet a bit of 'grunge' look to it that sort of mimics film grain. I've tried a lot of processes, but none have ever really left me satisfied.
Until a couple weeks ago. Rambling around the innernets, I stumbled across an article about B&W conversion techniques with GIMP. I thought I had exhausted all the options there but I was proven wrong.
Buried deep in the innards of GIMP is a plug-in that is a vestigal left-over from it's early developing days. Fact is, I was fully aware of it being there, but had never fully explored all the options. Under the Tool menu is a GEGL Operations…. option. (GEGL is an acronym for GEneric Graphics Language) Another window will pop up, and you can choose from about 20 rather cryptic option. I had dabbled with some of 'em, but they mostly seemed useless. For instance, "Color" merely filled the image with a chosen color. Oh, whoop-de-do! "Grey" converted most of the image to black, with random vertical bars with gray patterns in it. Fractals was sorta fun to play with, but I didn't see any practical use for my type of work. But for the most part, I quickly dismissed everything in the GEGL Operations drop-down menu choices. Most of the choices are much more readily accessible under other Menu items, and work much faster and better there.
One of the more puzzling choices was c2g. I must admit, I don't ever recall clicking on that to see what happened. Boy, I wish I had years ago.
c2g is an acronym for Color (to) Grayscale. Now, this isn't just any ordinary desaturation routine. It's more like tonemapping the colors of an image and using the results to generate the grayscale RGB for a given pixel. It’s hard to describe, and there’s precious little out there in the vast innernets world to explain it. What does exist is full of techno-babble gobbledeegoop that few understand.
Suffice it to say, this long-forgotten old-school method is quickly becoming one of my favorite B&W conversions. It’s not suited for every image, but I’m discovering it works for most of the images in my archive that I was still in search of a ‘proper process’ for.
Once you open the c2g window, there’s three sliders, labeled Radius, Samples and Iterations. I have yet to find anything online that explains their functions. Suffice it to say, the default choices (300, 4 and 10) will most likely render an image that will make you puke. It typically looks like an HDR gone terribly, horribly and totally wrong….. black shadows, halos to beat the band, and poor tonal rendering in the mid-range. But I decided to take the advice found on the site that caused me to revisit the function and try other settings.
Here’s what I found: The larger (in pixels) your image it, the more you need to increase the 3 settings. For instance, a 2000x1500 pixel might be fine at 800, 6 and 10 (respectively), but a larger image that comes from my D600 may require me to go to 1500, 12 and 15 to garner the look I’m after. So my Radius setting usually is between 800-1500 (depending on the image size), Samples is 6-12 and Iterations is set from 10-15.
A word of warning here: The process is both a total pig on your computer’s resources (meaning, you’ll likely notice everything else slows down or even halts for a while), plus it’s painstakingly s------l-----o------o------o-------o--------------w. Honestly, it can take up to 10 minutes to work it’s way through a single image.
Despite all it’s shortcomings, I’m finding it’s as close to what I have been looking for in a B&W/monochrome/desaturation process as I’ve ever seen.
I know a lot of folks look down their noses and GIMP, and some will view such an ancient, obscure and undocumented process as unworthy of their work. But that’s the beauty of photography…. If it works for me, I’m all for it!
With that, I offer up 15 images for your perusal and comments:

1

2

3

4

5

6

7

8

9

10

11

12

13

14

15
In short, given that GIMP is free, it might be worth downloading it just to try this process out! |
|
| トップへ戻る |
|
 |
Lloydy


登録日: 2009年9月2日
投稿: 7880
所在地: Ironbridge. UK.
Expire: 2022-01-01
|
投稿日時: 火 1月 28, 2014 9:16 pm 件名: |
|
投稿日時: 火 1月 28, 2014 9:16 pm 件名: |
|
|
Lloydy wrote:
Pictures like 5 & 14 - where there is old weathered wood - show good detail and tones. I dislike gimp immensely, I found it the most frustrating thing I'd ever tried so I removed it from my computer. But that looks good, I might try it again.
_________________
LENSES & CAMERAS FOR SALE.....
I have loads of stuff that I have to get rid of, if you see me commenting about something I have got and you want one, ask me.
My Flickr https://www.flickr.com/photos/mudplugga/
My ipernity -
http://www.ipernity.com/home/294337 |
|
| トップへ戻る |
|
|
480sparky
登録日: 2013年4月16日
投稿: 355
所在地: Iowa
|
投稿日時: 火 1月 28, 2014 9:18 pm 件名: |
|
投稿日時: 火 1月 28, 2014 9:18 pm 件名: |
|
|
480sparky wrote:
| Lloydy 氏の書き込み: |
| Pictures like 5 & 14 - where there is old weathered wood - show good detail and tones. I dislike gimp immensely, I found it the most frustrating thing I'd ever tried so I removed it from my computer. But that looks good, I might try it again. |
I've noticed that the more fine detail there is in the original image, the better the process works for it. Large, featureless areas of an image will start to show halos and artifacts.
For instance, the chipping paint in#4 is hardly visible in the original color image. |
|
| トップへ戻る |
|
|
pavko

登録日: 2011年1月31日
投稿: 216
所在地: PL
|
投稿日時: 火 1月 28, 2014 10:30 pm 件名: |
|
投稿日時: 火 1月 28, 2014 10:30 pm 件名: |
|
|
pavko wrote:
Thanks for the tip. I've checked it now and it gives promising results. Far better than film simulation one. |
|
| トップへ戻る |
|
|
fuzzywuzzy


登録日: 2010年12月18日
投稿: 1258
所在地: Down East, Canada, eh?
Expire: 2013-11-30
|
投稿日時: 水 1月 29, 2014 2:27 am 件名: |
|
投稿日時: 水 1月 29, 2014 2:27 am 件名: |
|
|
fuzzywuzzy wrote:
Nice results, thanks for posting.
I tried a couple of my images but it's going to take a while to experiment you weren't kidding about slow 
_________________
I welcome C&C, editing my pics and reposting them on the forum is fine.
NEX-F3
~~~~~~~~~
CZJ Sonnar 135/4, Biotar 58/2, Pancolar 50/2, Tessar 50/2.8, Flek 35/2.8, Flek 25/4
Super Takumar 135/2.5, 135/3.5, 100/4 bellows, 50/1.4, 28/3.5
Helios 58/2, 3M-5A 500/8, Mir 20M
Vivitar Series 1 70-210 - - - - - - - - Nikkor 200/4
Rikenon 28/2.8 - - - - - - - - Zeiss 50/1.7 Planar
PB 50/2.4, 135/2.8
Yashica 50/1.9, 28/2.8, 135/2.8
Hexanon 28/3.5, 50/1.4 |
|
| トップへ戻る |
|
|
patrickh

登録日: 2007年8月23日
投稿: 8551
所在地: Oregon
Expire: 2011-11-18
|
投稿日時: 水 1月 29, 2014 6:11 am 件名: |
|
投稿日時: 水 1月 29, 2014 6:11 am 件名: |
|
|
patrickh wrote:
wow and thanks
patrickh
_________________
DSLR: Nikon D300 Nikon D200 Nex 5N
MF Zooms: Kiron 28-85/3.5, 28-105/3.2, 75-150/3.5, Nikkor 50-135/3.5 AIS // MF Primes: Nikkor 20/4 AI, 24/2 AI, 28/2 AI, 28/2.8 AIS, 28/3.5 AI, 35/1.4 AIS, 35/2 AIS, 35/2.8 PC, 45/2.8 P, 50/1.4 AIS, 50/1.8 AIS, 50/2 AI, 55/2.8 AIS micro, 55/3.5 AI micro, 85/2 AI, 100/2,8 E, 105/1,8 AIS, 105/2,5 AIS, 135/2 AIS, 135/2.8 AIS, 200/4 AI, 200/4 AIS micro, 300/4.5 AI, 300/4.5 AI ED, Arsat 50/1.4, Kiron 28/2, Vivitar 28/2.5, Panagor 135/2.8, Tamron 28/2.5, Tamron 90/2.5 macro, Vivitar 90/2.5 macro (Tokina) Voigtlander 90/3.5 Vivitar 105/2.5 macro (Kiron) Kaleinar 100/2.8 AI Tamron 135/2.5, Vivitar 135/2.8CF, 200/3.5, Tokina 400/5,6
M42: Vivitar 28/2.5, Tamron 28/2.5, Formula5 28/2.8, Mamiya 28/2.8, Pentacon 29/2.8, Flektogon 35/2.4, Flektogon 35/2.8, Takumar 35/3.5, Curtagon 35/4, Takumar 50/1.4, Volna-6 50/2.8 macro, Mamiya 50/1.4, CZJ Pancolar 50/1,8, Oreston 50/1.8, Takumar 50/2, Industar 50/3.5, Sears 55/1.4, Helios 58/2, Jupiter 85/2, Helios 85/1.5, Takumar 105/2.8, Steinheil macro 105/4.5, Tamron 135/2.5, Jupiter 135/4, CZ 135/4, Steinheil Culminar 135/4,5, Jupiter 135/3.5, Takumar 135/3.5, Tair 135/2.8, Pentacon 135/2.8, CZ 135/2.8, Taika 135/3.5, Takumar 150/4, Jupiter 200/4, Takumar 200/4
Exakta: Topcon 100/2.8(M42), 35/2.8, 58/1.8, 135/2.8, 135/2.8 (M42), Kyoei Acall 135/3.5
C/Y: Yashica 28/2.8, 50/1.7, 135/2.8, Zeiss Planar 50/1.4, Distagon 25/2.8
Hexanon: 28/3.5, 35/2.8, 40/1.8, 50/1.7, 52/1.8, 135/3.2, 135/3.5, 35-70/3.5, 200/3.5
P6 : Mir 38 65/3.5, Biometar 80/2.8, Kaleinar 150/2.8, Sonnar 180/2.8
Minolta SR: 28/2.8, 28/3.5, 35/2.8, 45/2, 50/2, 58/1.4, 50/1.7, 135/2.8, 200/3.5
RF: Industar 53/2.8, Jupiter 8 50/2
Enlarg: Rodagon 50/5,6, 80/5,6, 105/5.6, Vario 44-52/4, 150/5.6 180/5.6 El Nikkor 50/2,8,63/2.8,75/4, 80/5,6, 105/5.6, 135/5.6 Schneider 60/5.6, 80/5.6, 80/4S,100/5.6S,105/5.6,135/5.6, 135/5.6S, 150/5.6S, Leica 95/4 |
|
| トップへ戻る |
|
|
Orio

登録日: 2007年2月24日
投稿: 29545
所在地: West Emilia
Expire: 2012-12-04
|
投稿日時: 水 1月 29, 2014 8:17 am 件名: |
|
投稿日時: 水 1月 29, 2014 8:17 am 件名: |
|
|
Orio wrote:
What you show looks very good. If the program runs on windows, I may have to give it a try. Thanks for sharing the knowledge.
_________________
Orio, Administrator
T*
NE CEDE MALIS AUDENTIOR ITO
Ferrania film is reborn! http://www.filmferrania.it/
Support the Ornano film chemicals company and help them survive!
http://forum.mflenses.com/ornano-chemical-products-t55525.html |
|
| トップへ戻る |
|
|
miran
登録日: 2012年8月1日
投稿: 1364
所在地: Slovenia
|
投稿日時: 水 1月 29, 2014 11:23 am 件名: |
|
投稿日時: 水 1月 29, 2014 11:23 am 件名: |
|
|
miran wrote:
Wonderful results! I think I might have read the same article, but I didn't get such good results with my photos. Will try again. 
By the way, I've been using the GIMP exclusively for PP for many years now and I had no idea this features existed.  |
|
| トップへ戻る |
|
|
eddieitman

登録日: 2011年4月12日
投稿: 1246
所在地: United Kingdom
|
投稿日時: 水 1月 29, 2014 8:43 pm 件名: |
|
投稿日時: 水 1月 29, 2014 8:43 pm 件名: |
|
|
eddieitman wrote:
These look great will have to install again and check it out
_________________
My web site www.digital-darkroom.weebly.com
Life is like a camera. Focus on what's important, capture the good times, develop from the negatives and if things don't work out, just take another shot. |
|
| トップへ戻る |
|
|
kds315*

登録日: 2008年3月12日
投稿: 16909
所在地: Kehl, Germany
Expire: 2021-03-09
|
投稿日時: 水 1月 29, 2014 10:26 pm 件名: |
|
投稿日時: 水 1月 29, 2014 10:26 pm 件名: |
|
|
kds315* wrote:
Looks fine to me, some are really good! Nice find, thanks for sharing..
_________________
Klaus - Admin
"S'il vient a point, me souviendra" [Thomas Bohier (1460-1523)]
http://www.macrolenses.de for macro and special lens info
http://www.pbase.com/kds315/uv_photos for UV Images and lens/filter info
https://www.flickr.com/photos/kds315/albums my albums using various lenses
http://photographyoftheinvisibleworld.blogspot.com/ my UV BLOG
http://www.travelmeetsfood.com/blog Food + Travel BLOG
https://galeriafotografia.com Architecture + Drone photography
Currently most FAV lens(es):
X80QF f3.2/80mm
Hypergon f11/26mm
ELCAN UV f5.6/52mm
Zeiss UV-Planar f4/60mm
Zeiss UV-Planar f2/62mm
Lomo Уфар-12 f2.5/41mm
Lomo Зуфар-2 f4.0/350mm
Lomo ZIKAR-1A f1.2/100mm
Nikon UV Nikkor f4.5/105mm
Zeiss UV-Sonnar f4.3/105mm
CERCO UV-VIS-NIR f1.8/45mm
CERCO UV-VIS-NIR f4.1/94mm
CERCO UV-VIS-NIR f2.8/100mm
Steinheil Quarzobjektiv f1.8/50mm
Pentax Quartz Takumar f3.5/85mm
Carl Zeiss Jena UV-Objektiv f4/60mm
NYE OPTICAL Lyman-Alpha II f1.1/90mm
NYE OPTICAL Lyman-Alpha I f2.8/200mm
COASTAL OPTICS f4/60mm UV-VIS-IR Apo
COASTAL OPTICS f4.5/105mm UV-Micro-Apo
Pentax Ultra-Achromatic Takumar f4.5/85mm
Pentax Ultra-Achromatic Takumar f5.6/300mm
Rodenstock UV-Rodagon f5.6/60mm + 105mm + 150mm
|
|
| トップへ戻る |
|
|
Katastrofo
登録日: 2007年2月26日
投稿: 10405
所在地: USA
Expire: 2013-11-19
|
投稿日時: 木 1月 30, 2014 5:20 am 件名: |
|
投稿日時: 木 1月 30, 2014 5:20 am 件名: |
|
|
Katastrofo wrote:
Excellent work, especially like the Selmer Mark VI alto sax. |
|
| トップへ戻る |
|
|
Bunter

登録日: 2014年1月31日
投稿: 1
所在地: Colchester. UK
|
投稿日時: 金 1月 31, 2014 8:22 pm 件名: |
|
投稿日時: 金 1月 31, 2014 8:22 pm 件名: |
|
|
Bunter wrote:
Great discovery, just had a quick go, great stuff. |
|
| トップへ戻る |
|
|
RSalles

登録日: 2012年8月12日
投稿: 1372
所在地: Brazil - RS / South
|
投稿日時: 土 2月 01, 2014 12:05 am 件名: |
|
投稿日時: 土 2月 01, 2014 12:05 am 件名: |
|
|
RSalles wrote:
| Orio 氏の書き込み: |
| What you show looks very good. If the program runs on windows, I may have to give it a try. |
Yes, it does.
Even having Linux as my primary OS, I still relay on Windows for digital development platform, with LR and PS. But it doesn't hurt to try out sometimes LightZone and Gimp, for instance, with raw files which are a bit out of the usual rendering.
So, the other day I made some still with the LF camera, and checking for lightning setup and exposure I ended with a series of test pics in my memory card.
Today I filled gimp with it and used the tool you've mention. Here is the result:
The original file:

Converted with Gimp/EGL
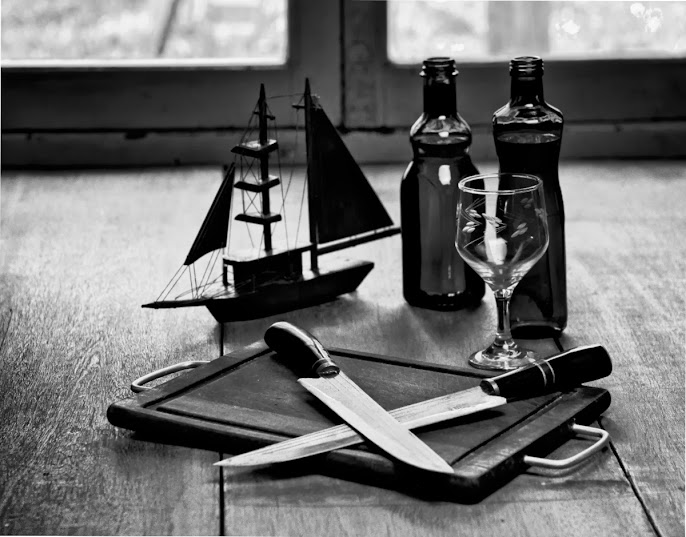
... and payed attention to the texture on the wood table top...
Nice tool, thanks for sharing,
Renato |
|
| トップへ戻る |
|
|
|
|
 日本語
 Español
 中文
 Magyar
 Русский
 Deutsch
 Français